Starting with a template


Objectives


By the end of the chapter you will have:

  • read and understood a pre-written preamble
  • prepared a title page, contents, list of tables and list of figures
  • prepared a preface and abstract page
  • prepared an acknowledgements page

Reading the preamble


Activity - Download the template document (right click, save link as)


Open and read through the pre-written preamble. Ensure that you understand what each line is doing. Notice that text that is preceded by % sign is greyed out. These texts are comments that will not be compiled.

Find the comments which read %Explain...here%. Google these packages and fill in the information between the % signs.


Activity - Complete comments in the preamble


%Explain epstopdf here%

%Explain babel here%

%Explain \leftmark here%

%Explain float here%

%Explain hyperref options here%

Compiling


Now it is time to save your document. Click File, then Save As. Save the document with a new filename.tex. The .tex is important. If you do not use this file extension you will get an error of:

The file could not be saved. Please check if you have write permission.

Scroll down to \begin{document}. Everything that goes between begin and end document will appear in the content of your thesis.

Activity - Put some text after %Thesis content and click the arrow next to quick build.


You should now have a PDF in the embedded viewer and in the same folder as your .tex file. There will also be other files with file extensions .aux,.out and .synctex. Do not worry about these files, just leave them where they are.

Remember that if you used basic MiKTeX then the compilation will take a while for the first time. You will be prompted to install the necessary packages, just keeping pressing ok.


Creating a title page


Check your university requirements for what must go on the title page and how it must be formatted. In all cases you will need to remove the header that we have on every page with \thispagestyle{empty}.

We can control the position of text and images using \begin{center,flushright or flushleft} followed by text/image and \end{center,flushright or flushleft}. 
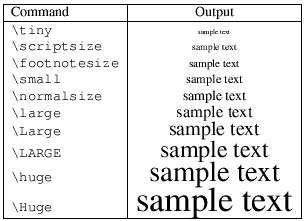
We can then control the size of the text with the commands in the table on the right. Just remember once you've used an unusual font size, use \normalsize to get back to the regular-sized font. Finally we can change the style of the text to bold \textbf{bold text here}, italic \textit{} or \emph{} emphasis. There are more options available under LaTeX and Font Styles.

To create vertical gaps between text or images we can use \vskip followed immediately by a length. All the lengths accepted by LaTeX are available on the Wikipage. This is appropriate for a title page but if you need a vertical space within a block of text use \vspace{length} instead.

We can put all of these together to create a title page. See the next slide for an example.

Title page example


The code on the right is an example title page. The indentations are not necessary, they are there to make the code more readable. Note that changing text size does not require curly brackets but changing text style does.

\includegraphics is used to input a picture. Including graphics is discussed in more detail in Chapter 6: Including figures.

\vfill pushes the rest of the content to the bottom of the page. This is therefore a flexible vertical whitespace that will adapt to your content.

Finally, the \\ end the line, ensuring that the next text appears on the next line. This is not needed in the main text but is useful on special pages and in tables.

Activity - Create your own title page (leave out the university logo for now).

\thispagestyle{empty}
\begin{flushright}
	\includegraphics[width=6cm]{university_logo}
\end{flushright}	
\vskip40mm
\begin{center}
	\huge\textbf{Dissertation Title}
	\vskip5mm
	\Large\textbf{Candidate Number: ######}
	\normalsize
\end{center}
\vfill
\begin{flushleft}
	\large
	Submitted for the degree of.... \\
	University of ....	\\
	\today
\end{flushleft}	

Creating an Acknowledgements, Preface and Abstract page


These pages need to have a centered block of text in the middle of the page. To do this we create a minipage that is 80% the width of the text and then center it horizontally.

\begin{center}
\begin{minipage}{.8\textwidth}


We then use \addcontentsline{toc}{chapter}{Acknowledgements} to ensure that it gets added to the Table of Contents (required as the chapter is un-numbered) and\phantomsection to ensure the page appears in the PDF bookmarks.

Then we add the chapter heading with\chapter*{\centerline{Acknowledgements}} and close the minipage.

We wrap the minipage with \vspace*{\stretch{number}}. This centers the text vertically on the page and the numbers give the ratio of empty space. The example on the right shows that there is more space at the bottom than the top as the top vspace has a stretch value of 2 and the bottom has a stretch value of 4. Finally, we use \clearpage to ensure the correct numbering in the Table of Contents.

Activity - Use this example to create your own Abstract, Preface and Acknowledgements page.


\clearpage
\vspace*{\stretch{2}}
\being{center}
	\begin{minipage}{.8\textwidth}
	\addcontentsline{toc}{chapter}{Acknowledgements}
	\phantomsection
	\chapter*{\centerline{Acknowledgements}}
		Your text here
	\end{minipage}
\end{center}
\vspace*{\stretch{4}}
\clearpage

Creating a Table of Contents


After the Abstract and Preface page we will add the contents page with a List of Figures and List of Tables. Firstly add a new page and then add the contents to the PDF bookmarks. These are the sections that appear on the left of your PDF viewer which allow you to navigate through your document easily.
\newpage
\pdfbookmarks[0]{Contents}{contents_bookmark}
\tableofcontents


To add the List of Figures and List of Tables we use the following (which should be familiar from the last slide).

\listoftables
\phantomsection
\addcontentsline{toc}{chapter}{List of Tables}

\listoffigures
\phantomsection
\addcontentsline{toc}{chapter}{List of Figures}


Activity - Create your Contents, List of Figures and List of Tables.