
By the end of the chapter you will be able to:
Tables are created using the tabular environment:
\begin{tabular}[postion]{text justification}
The position option controls where the table appears on the page; b for bottom, c for center (default) and t for top. The text justifcation is declared seperately for each column.
| can also be used to create vertical lines between columns. So to begin a table of 3 columns with the first column left justified, the others centered and
vertical lines between columns, we use:
\begin{tabular}{l|c|c}
To enter data into the table we seperate each entry with & and end each line with \\. Finally to put in horizontal
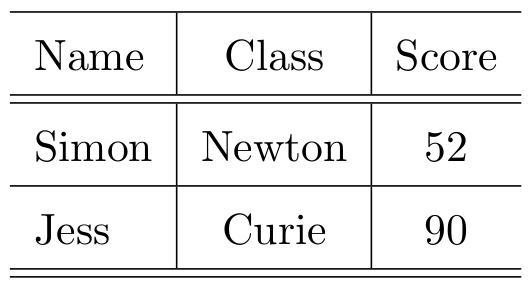
lines we use \hline. Putting all this together creates a table like this:
\begin{tabular}{l|c|c}\hline
Name & Class & Score \\ \hline \hline
Simon & Newton & 52 \\ \hline
Jess & Curie & 90 \\ \hline \hline
\end{tabular}| Justification | Explanation |
|---|---|
| l | Left justified cell contents |
| c | Centered cell contents |
| r | Right justified cell contents |
| p{width} | Paragraph with text at the top of the cell |
| m{width} | Paragraph with text in the middle of the cell (requires array package) |
| p{width} | Paragraph with text at the bottom of the cell (requires array package) |

To span multiple columns we use:
\multicolumn{no.of columns to span}{justification}{cell contents}
So to span two columns with center justified text:
\multicolumn{2}{c}{text}
To span multiple rows add \usepackage{multirow} to the preamble, then use:
\multirow{no. of rows to span}{width}{cell contents}
The width can be set to the natural width of the rows being spanned using *. So to span 4 rows we can use:
\multirow{4}{*}{text}
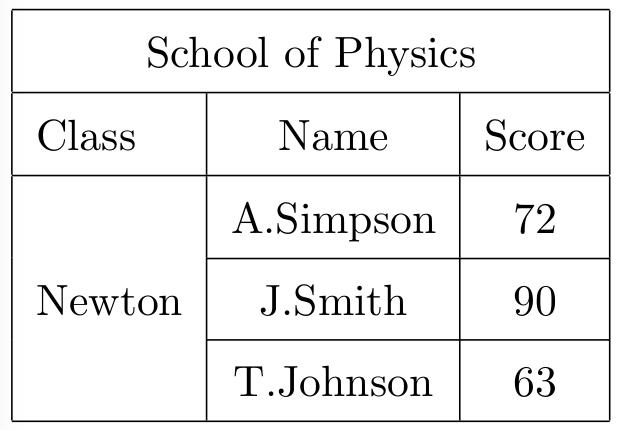
Putting these two together means that we can create much more complicated tables. In the example to the right \cline{2-3} creates a horizontal line
that only spans columns 2 to 3.
Activity - Create a table in one of your chapter files.
\begin{tabular}{|l|c|c|} \hline
\multicolumn{3}{|c|}{School of Physics} \\ \hline
Class & Name & Score \\ \hline
\multirow {3}{*}{Newton}
& A.Simpson & 72 \\ \cline{2-3}
& J.Smith & 90 \\ \cline{2-3}
& T.Johnson & 63 \\ \hline
\end{tabular}
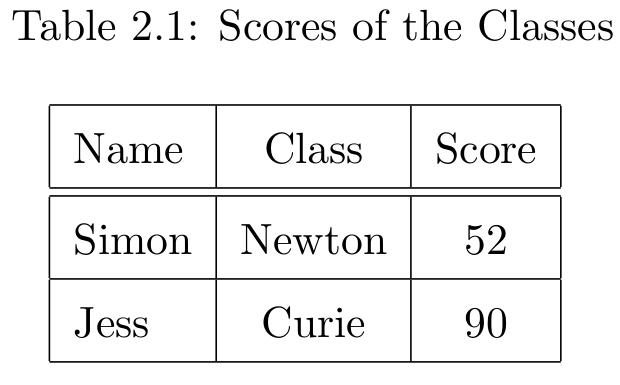
To caption tables the tabular environment needs to be placed inside the table environment. This also ensures that the table appears in the List of tables at the beginning
of the document. See the example.
\begin{table}[h]\caption{Scores of the Classes}
\centering
\begin{tabular}{|l|c|c|} \hline
Name & Class & Score \\ \hline \hline
Simon & Newton & 52 \\ \hline
Jess & Curie & 90 \\ \hline
\end{tabular}
\label{tab:class}
\end{table}Activity - Give your table a caption and check that it appears in the List of Tables.

Some tables are quite complex and you may not wish to type them out yourself. You can download a plugin for your spreadsheet which will create the LaTeX code for
you or you can use an online table generator that will write the code as you create the table.
If these files are large you do not need to copy and paste them into your chapter file. You can save them as a .tex file and then use \input{}
to load the table tex file into your chapter file. Remember to save the table file in the same directory as the chapter file and compile the main document, not the
chapter file.
The table on the right shows the various plugins available. Clicking on the plugin name will take you to the appropriate website where you need to follow the installation
instructions.
| Plugin | Spreadsheet |
|---|---|
| Calc2LaTeX | Open Office |
| excel2LaTeX | Excel |
| matrix2LaTeX | Matlab and Python code |
| latex-tools | Ruby code |
| xtable | R |
| For emacs | Emacs |